
I booked this trip imagining a cozy NYC winter wonderland. Instead, we arrived to a city digging out from a blizzard, transportation delays everywhere, and two ADHD boys with the energy of a popcorn machine who still needed to move, snack, and explore.
By the end, we hadn’t checked off every box on my spreadsheet, but we had something better: a flexible, budget‑friendly, realistic way to do NYC in winter as a widowed solo mom with two neurodivergent boys.
This is the real version of our trip—what worked, what didn’t, and the hacks I’ll use every time we travel now.
The “Widowed Solo Mom with ADHD Boys” NYC Vibe
If you’re:
- Solo parenting with no partner to tag‑team meltdowns.
- Traveling with ADHD kids who need movement, novelty, and snacks on loop.
- A spreadsheet‑loving brain that over‑analyzes every expense.
Then you’ll probably recognize yourself in this trip.
Our situation:
- NYC in winter, right after a blizzard.
- 1 adult, 2 boys (8 and 11), both with ADHD.
- Budget travel, family‑friendly plans, and a strong “we are not here to impress anyone” philosophy.
My expectations had to adjust. The blizzard and transportation delays forced us to stop chasing a “perfect” itinerary and start protecting our energy instead.
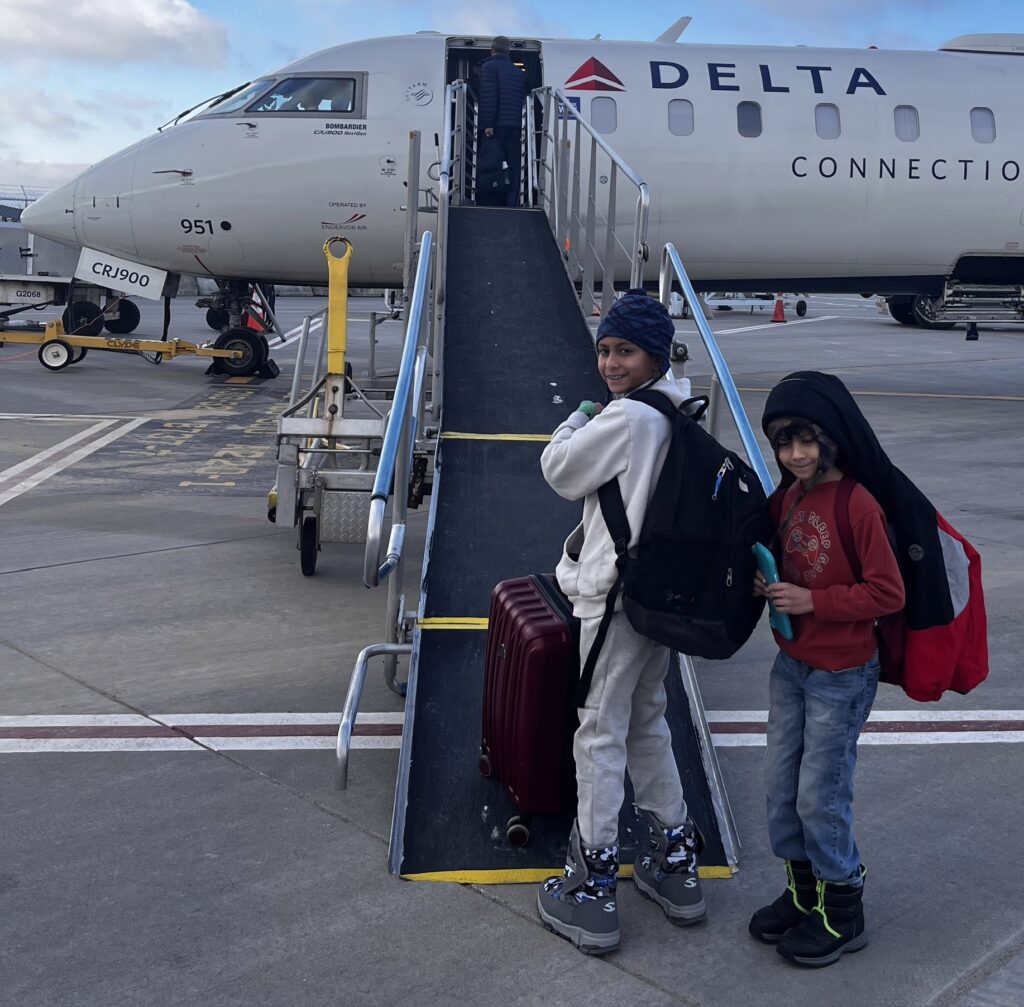
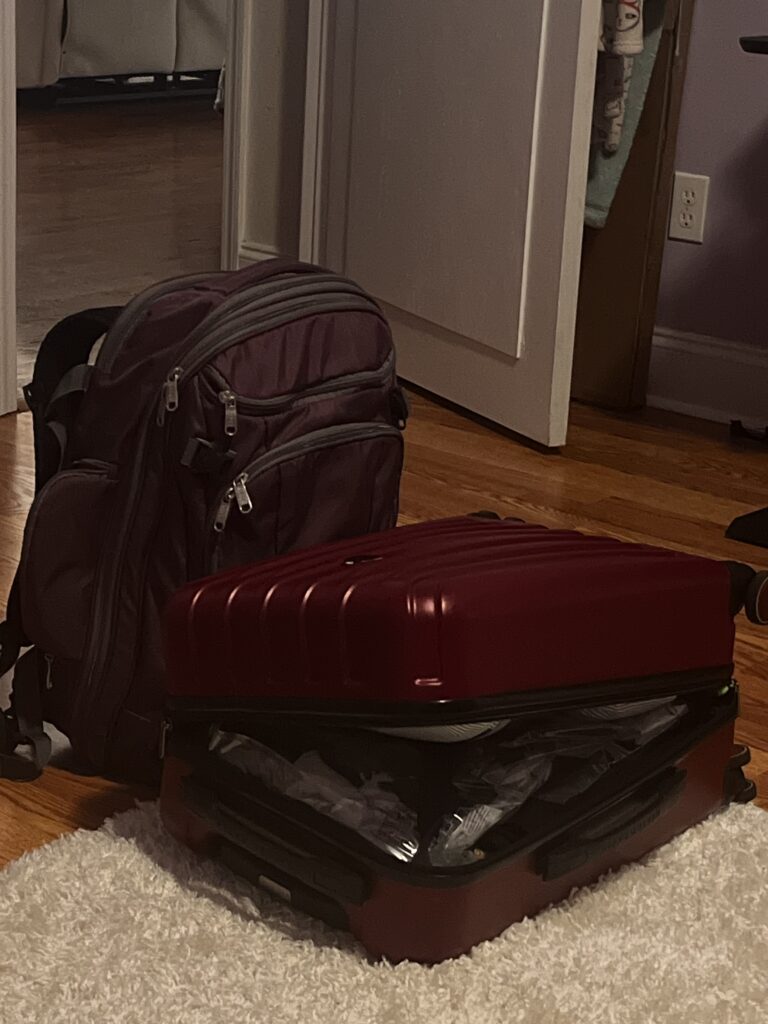
How We Packed for NYC in the Snow (With Just One Carry‑On)
We flew carry‑on only: one suitcase for three people plus our backpacks. That choice shaped everything about what we brought.
What worked
- Rolling compression bags or compression packing cubes
- Thermal base layers + one great coat.
We stopped trying to be cute and went functional: - Thermal base layers.
- Comfortable tops and pants.
- One serious winter coat each.
- Hats, scarves, gloves, and a balaclava for the coldest times.
- Re‑wearing outfits.
We didn’t get soaked, so we reused: - The same sweaters.
- The same jeans.
- Great warm wool socks.
- Snow/waterproof boots.
Our boots were secondhand hand‑me‑downs from neighbors, and they worked perfectly for slush, snow, and long walks. - Light but important extras.
- Extra underwear and socks (always worth it).
- Moleskin and bandaids for blisters.
- Power banks and cords so nobody’s phone died mid‑transit.
Bags and security
We each had a backpack, and mine was a travel‑friendly, safety‑minded bag:
- Think Baggalini‑style:
- Straps that can’t easily be cut.
- RFID protection.
- Locking zippers.
- I also checked ahead when I could to see if attractions had lockers or coat check, which really matters when everyone is overheating in giant coats indoors.
ADHD‑friendly additions
- We have TSA-precheck, which makes long lines easier to handle!
- AirTags in a wrist holder, or on a keychain style clip, in their pockets, in the kids’ bags or coats gave me peace of mind in crowds.
- Touch‑screen gloves so I could still use my cell phone without freezing fingers.
- I involved them in navigation:
- Counting subway stops.
- Figuring out if we were going uptown or downtown.
- Finding which side of the street to walk on.
Giving ADHD kids a “job” turns the city into a game instead of a lecture.
What I’d change next time
- Pack even less.
We were fine re‑wearing clothes. I could have shaved down the clothing list further. - Body warmer stickers over hand warmers.
Stick‑on warmers for under jackets were much more useful for long periods outside than traditional hand warmers. - Move the “medical kit” to the day bag.
Bandaids, pain relief, and blister care need to be with you, not at the hotel. - Simplify winter accessories.
I wish I had brought ear muffs and a face cover/gaiter instead of extra beanie caps and gloves. Most stores sold ear-muffs for about $10 a pair.
Navigating NYC Transit as a Solo Mom (With Travel Hacking)
NYC transit is intense the first day, but it’s also the best budget tool you have—especially if you understand a few basics and how payments work.
Subway basics with kids
- Fares and passes.
- A single subway ride is about \$3.
- A 7‑day unlimited pass is great if one person will ride a ton—but it’s tied to that one person only.
- If you’re tapping with a phone or card, each person using their own payment method can earn their own “free ride” benefits over time.
- First‑ride approval trick.
- Use a different card for your very first tap of the trip.
- Sometimes the first transaction needs bank approval and won’t immediately work to pay for multiple people.
- Kids and turnstiles.
- Shorter kids can walk under the turnstile (that’s what my youngest did).
- I had them go through in front of me, then I tapped and followed right behind.
- That way, no one gets stranded on one side while the rest of us are on the other.
General transit sanity tips
- Choose an accommodation centrally located to your plans. We choose midtown next to Grand Central Terminal.
- Subway > bus in winter most of the time.
It’s usually faster and more predictable than sitting in traffic. You’re also warm and covered. - Elevated trains = bonus entertainment.
Sections like Queens Plaza have elevated tracks, which the kids loved because they could look out over the city. - Apps that actually helped.
- Citymapper was very helpful for choosing routes.
- Google Maps was not always accurate for real‑time transit, so I relied more on Citymapper.
Travel hacking: Uber vs Lyft
I lean into credit‑card perks and dynamic pricing:
- I compare Uber and Lyft each time.
- Lyft typically gets 5x points on my Chase cards.
- Uber occasionally partners with Delta or has specific credit‑card promotions.
A 30‑second price + rewards check can save a surprising amount over a few days.
Food Strategy: Grazers, Not Three‑Course Diners
My kids are not “sit through a long restaurant meal” kids. They are grazers. And, so am I.
How we handled food
- Too Good To Go app.
- We used it to grab discounted surprise bags from nearby places.
- Great for snacks or light meals without committing to a full menu.
- Fast‑casual, counter‑service spots.
- Much quicker than sit‑down restaurants.
- Lower stakes if one kid decides suddenly they’re “not hungry.”
- Easy to mix and match food choices.
- Sugar Factory (Times Square).
- This was our big splurge and a fun sensory overload.
- I would give yourself at least 2 hours:
- Time for orders.
- Time for photos.
- Time to recover from the sugar and noise before diving back into the city.
Our Blizzard‑Proof “Anchor” Plan
To avoid losing my mind with last‑minute changes and delays, I chose anchors instead of a packed schedule.
Our must‑dos:
- See the Statue of Liberty from a boat.
- Visit one observation deck.
- Spend a day at the American Museum of Natural History.
- Walk through Times Square at least once.
- See one play or kid‑friendly performance.
Everything else was “nice to have.”
When the Plan Fell Apart (And Got Better)
The Express Bus Groupon that wasn’t running
I thought we’d start with an express bus tour: warm bus, narrated ride, see the landmarks in one loop.
Surprise: our Groupon bus wasn’t actually running yet. When I called, they told me they only started service after March 15. It forced us to pivot quickly.
Summit One: Veteran discount + booking strategy
Because the bus wasn’t an option, we leaned into Summit One for our observation deck.
Tips:
- They offer a great veterans/military discount in person.
- If you qualify, go earlier in the day and buy your tickets at the counter.
- It books up fast, so don’t wait until the last minute.
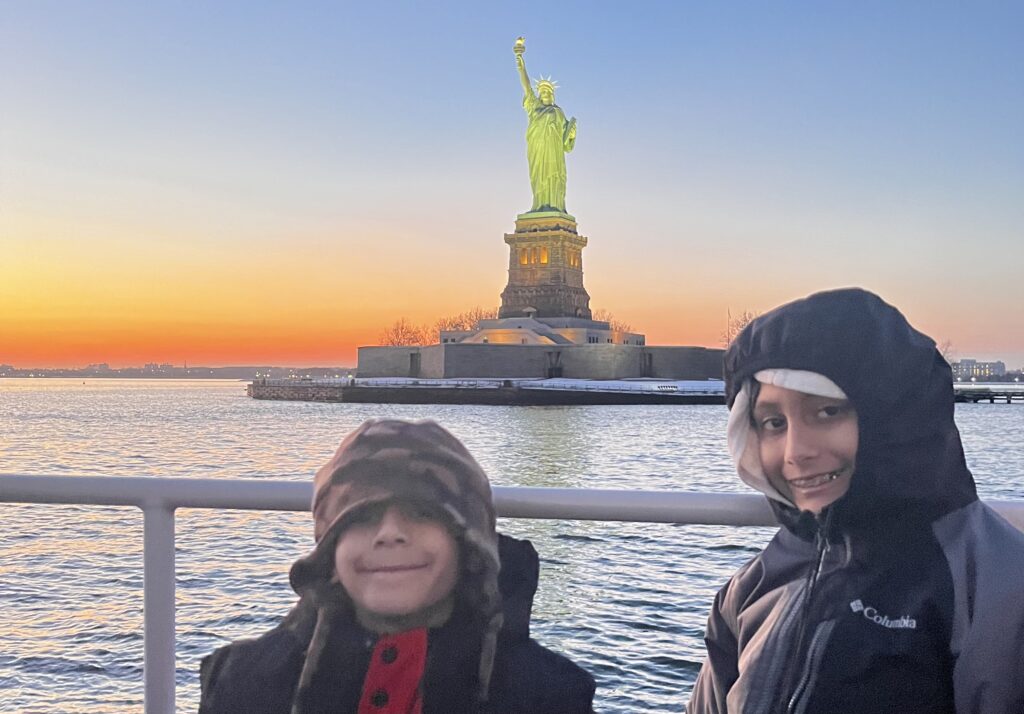
The boat tour we “missed” and the sunset cruise we loved
Our boat tour to see the Statue of Liberty and skyline was scheduled for 4 pm.
We were coming from the Lunar New Year festival in Chinatown, which was amazing—but:
- Streets were blocked for the festival.
- Traffic was gridlocked.
- Our Lyft couldn’t get through.
We ended up missing the 4 pm boat and getting moved to a sunset cruise instead. And it was honestly better:
- The skyline lit up.
- The Statue of Liberty at sunset felt magical.
- The kids were enamored the entire time.
The boat itself was mostly outside, with a VIP indoor area. We layered up and moved between spaces depending on the wind and temperature. That “happy mistake” is now one of my favorite family memories.
Indoor Wins: Museums, Stores, and Libraries
American Museum of Natural History (AMNH)
We dedicated a solid day to AMNH and it was absolutely worth it.
- We started with the one hour Highlights Tour.
- I highly recommend doing this first.
- It orients you and shows you major exhibits quickly.
- Afterward, you can circle back to what your kids loved most.
- Instead of scavenger‑hunt style missions, I kept reflections simple:
- “What is one thing you learned today?”
- “What was your favorite exhibit, and why?”
- We added the Invisible Worlds exhibition (extra ticket), and it was a huge hit—visually rich, immersive, and great for curious, sensory‑seeking kids.
- Warning: the museum café is very expensive.
- Think around $5 per 1/4 lb of food. I was impressed they had a “hot food” section however.
- Good to know if you’re budgeting or prefer to pack snacks.
Stores that actually worked for us
We didn’t end up doing M&M’s, the Times Square Disney Store, or FAO Schwarz this trip. Instead, our big “fun” stops were:
- The LEGO Store in the Flatiron District.
- EATALY (for me—hello, food heaven).
- The Harry Potter Store, which is genuinely cool even if you’re not a huge Harry Potter fan.
The key was letting each kid have some choice:
- “You pick one place that’s for you.”
- “I pick one place that’s for me.”
- That balance kept everyone more cooperative.
Library time: Stavros Niarchos Foundation Library (NYPL)
One of my NYC parent hacks is: use the library system.
- We visited the Stavros Niarchos Foundation Library.
- The kids got a day pass to use the computers.
- The children’s/computer area we used was on the lower level, marked “C” on the elevators.
- Libraries are:
- Warm.
- Free.
- Structured without being overstimulating.
- Full of events if you time it right.
Shows, Events, and How I Found Free or Cheap Things
We like supporting smaller, local experiences as well as big attractions.
TADA! Youth Theater
We saw a show at TADA! Youth Theater, and it was such a good experience:
- Kid performers.
- Shorter runtime.
- More relaxed atmosphere than a huge Broadway house.
- It felt good to support a local youth theater.
How I find events before a trip
I treat planning like a mini research project and check:
- MommyPoppins – roundups of family‑friendly events and activities.
- Library websites – NYPL, Brooklyn Public Library, Queens Public Library.
- Eventbrite – for free and low‑cost happenings.
- TDF.org – for discounted theater tickets if you’re a member.
- TodayTix app – for same‑day or discount theater options.
- 1iota.com – for TV show tapings; note that most tapings don’t allow kids, but the Today Show has no age limit.
- ClubFreeTime.com – I check the listings there, then Google the specific events for details. That led me to:
- Free dance performances.
- Free student concerts (like Juilliard student performances).
- Other one‑off cultural events that wouldn’t show up on generic “Top 10” lists.
And don’t forget: Brooklyn has a ton of kid‑friendly activities too if you’re willing to ride the subway a bit—museums, playgrounds, family‑friendly cafés, and neighborhood events.
What I’ll Repeat Next Time (And What I’ll Skip)
Will definitely do again
- Build a trip around 5 anchors, not 25 stops.
- Keep packing to one carry‑on and lean on layers.
- Use Citymapper first for transit, and trust Google Maps less for live subway data.
- Prioritize:
- One great museum day.
- One observation deck.
- One meaningful show.
- One special restaurant experience.
- One solid library or quiet indoor day.
Will skip or modify
- Over‑stuffed “we must see every tourist spot” itineraries.
- Long, sit‑down meals unless it’s a specific “event” restaurant.
- Buying tickets without calling ahead (looking at you, bus tours that don’t run until mid‑March).
Final Thoughts: NYC Winter with ADHD Kids as a Solo Mom
Traveling to NYC in winter as a widowed solo mom with two ADHD boys was not neat or perfect. But it was real, memorable, and surprisingly peaceful once I stopped trying to force the itinerary to behave.
What worked for us:
- Less is more.
- Rest is part of the plan, not a failure.
- Kids having a “job” calms everyone down.
- Pivoting when things change can lead to the best memories.
If you’re planning a similar trip, you don’t need to do everything. You just need a few meaningful experiences, warm socks, flexible expectations, and permission to let the “mistakes” become the best parts.
Here’s a section you can drop near the end of your post, just before your “Final Thoughts” or gear/affiliate section.
Post‑Trip Reset and Packing Systems That Actually Help
The trip doesn’t really end when you land—it ends after the suitcase explosion at home. As a solo parent, that last phase can feel just as overwhelming as the planning.
Here’s what I do to make it less painful:
- I park the suitcase and shoes in the garage for at least one night.
I’ll spray/disinfect them before bringing them fully inside. It just makes me feel better about any germs we might have brought home with us. - We try to keep dirty clothes separate while we travel.
As soon as we’re home, those go straight into the wash so the laundry mountain feels a little more contained. - I find packing and unpacking really overwhelming, so I use tools and systems to take the mental load off.
- I use PackPoint and my own Notes app to make packing lists and check things off as we go.
- Sometimes I’ll keep the suitcase open a few days before a trip and just toss things in as I think of them, then refine and organize the day before we leave.
- I remind myself that “putting the house back together” after a trip is part of the journey.
Building a little system around it—garage quarantine, immediate laundry, and app‑based lists—keeps it from feeling like a second job.
Below are the exact (or similar) items we packed or used on this NYC trip. These are affiliate links, which means I earn a small commission if you purchase through them, at no additional cost to you. Thank you for supporting our little corner of the internet—it genuinely helps me keep sharing budget‑friendly travel tips for solo parents.
You may find these “lists” helpful: Solo Parent Adventure Kit and Travel Products we love
Items with links:
- Kids’ thermal base layers:
- budget set: https://amzn.to/4cn3vMS
- merino wool set: https://amzn.to/4srEPHP
- My thermal layers: brands: 32 degrees, baleaf winter leggings that have pockets, smartwool top
- Wool socks
- Snow boots: https://amzn.to/4rVYb84
- Moleskin stickers: https://amzn.to/40bPvy9
- Touch‑screen gloves:
- AirTags: 4 pack 1st gen ; 4 pack 2nd gen (about $35 more)
- Power bank (I like ones with USB-A outputs so I can use a multi connector plug to charge several deices): 5000mAh
- Body warmers with adhesive: https://amzn.to/4cXbQqM
- Travel backpack / crossbody: Bagallini anti-theft travel backpack ; Travelon anti-theft crossbody
- Collapsible water bottle (I reinforce the edges with duct tape): https://amzn.to/4l8pXvr